Resin Casting in Silicone Mold

The goal of this project is to create castings of the eraser grip that was molded prior. Please first look at the grip molding page. Below is the process work used to create casts of the eraser grip.


1) Fabricate Box
To make the initial box foam core was cut to accommodate 3/4" walls away from the part being cast on all sides.
2) Mold soft clay around the part being cast
The part below the soft clay layer can be filled in with any material, but it is essential to have a good seal on the clay. For the easiest access the box was left without all its sides until the clay was in place
3) Registration Marks
Once the soft clay is smoothed along the part and all walls are up registration marks should be added. These marks serve as indicators as to where to place the top half of the silicone mold with respect to the bottom. Additionally the tool used to create registration can be used to create 90 degree angles of the clay to the part and create a neater parting line on the cast.
This view is to demonstrate the orthogonality of the soft clay to the part
_gif.gif)

1
2
4) Creating 1st Half of Mold
Once the registration marks are done and the soft clay is cleaned up spray release can be added to the entirety of the top. This spray release makes the clay and part easier to remove before casting the second side. Once poured (no picture of the first side being poured) the silicone was left overnight to settle. A funnel was poked into the part so the part could be cast later.
5) Creating 2nd Half of Mold
Once the 1st half was solidified, the silicone was removed from the soft clay, note that the part and its blank were left in the silicone. Once separated a new box was constructed around the fist silicone mold so the second half could be poured. Next, mold release was applied to the box and top of the first silicone casting. When the box was sprayed and ready the second batch of silicone was poured using a 10:1 ratio of parts. The silicone was left to solidify overnight and developed into a firm yet giggle silicone mold. The part and its blank were removed easily since the box was designed with a middle parting line.
_gif.gif)
_gif.gif)
For the second box a paper cutter was used since it gave better edges than the box cutter

The left is the top mold after being poured. The right photo is the settled mold. There is a shine to the settled mold as well as a characteristic silicone feel.


This photo displays the two sides of the silicone mold alongside. If observed closely there is a hole in the mold from the funnel being cast in. The rectangular indent is a place holder for an eraser and is called a "blank". The blank is preserved in the silicone.

6) Casting with the Mold
Once the second half of the silicone has solidified and the part is removes the mold is complete and ready to be cast in. The cast was then filled with a 4-6 hour epoxy with a 10 minute pot life. To ensure that minimal air gaps are left there were air holes drilled into the deepest points in the the grip. Additionally the cone that was cast into the first side of the mold helped siphon epoxy into the mold. To help draw out air bubbles the casting was repeatedly hit against the table and for some casts placed into a vacuum chamber
The resin must be carefully poured to fill in all parts of the mold. This particular picture is an example of why certain resins are better suited for casting. The resin used in this cast had a pot life of 5 minutes and does not turn hard once cured. While pouring the resin started to solidify and this cast was unsuccessful.
7) Removing Air from Cast
Bubbles can create damaging gaps in a cast. To remove air manual beating of the mold can be done until resin seeps out of the air holes. Alternatively a pressure chamber will also remove air from a cast by drawing all the gas out of the resin.
This paint sprayer was used to pressurize the castings and remove air
_gif.gif)
Manual hitting of the part helps remove air. This method is less effective than pressurizing the cast.


The raw part on the blank had harsh parting lines and a large bubble where the funnel entered the mold cause large air gaps.
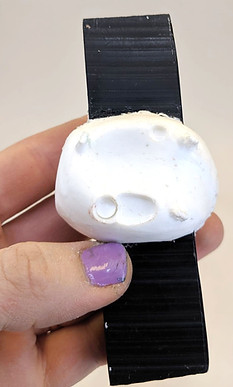
8) Post Processing

In an attempt to cover blemishes acrylic paint was used. Unlike its purpose the paint highlighted blemishes and resulted in a messy looking final product.
Sanding the rigid resin with 100 grit, 220 grit and wet 800 grit resulted in a much better finish than the painted part. The sanding did reduce the obvious ridges of the grip that we initially molded. However when using the grip it still felt well situated in my hand.


This is a photo of my most-refined casting. The body of the grip is smooth and resembles marble. Had I cast another I would attempt to do so around an actual eraser.
